A-I-DESIGN Organizational Chart
Standard Procedure for Using PERSPECTIVE / A-I-DESIGN
1. Create a PERSPECTIVE User Account
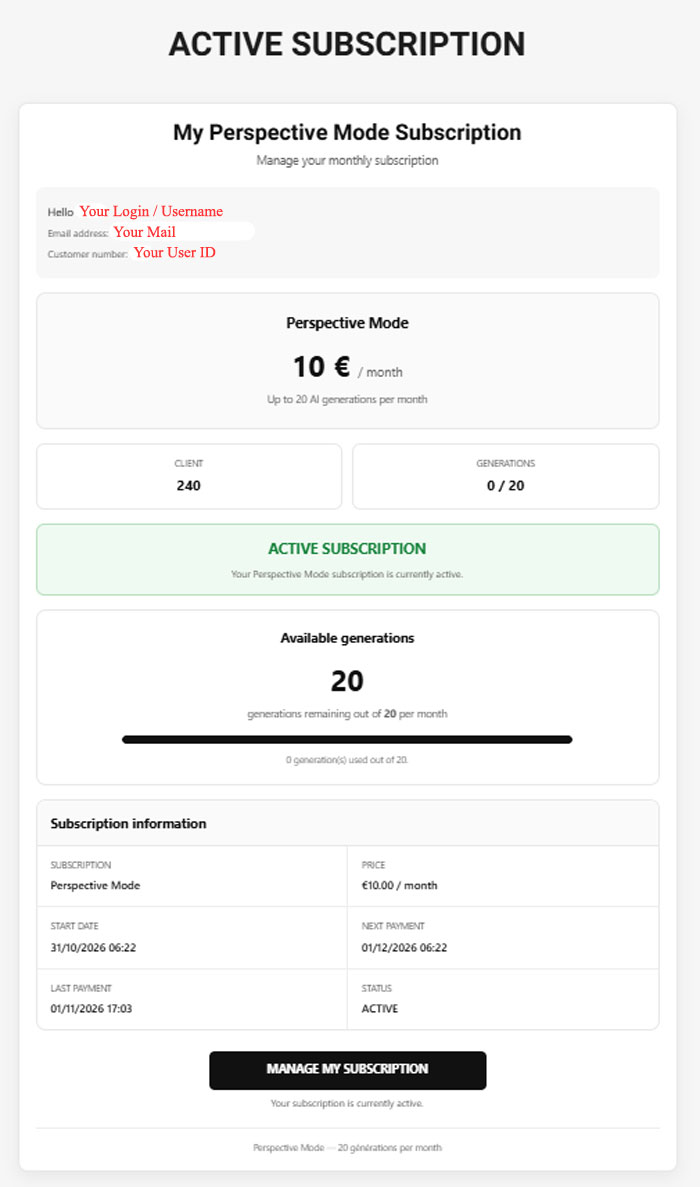
First, create a personal account on the PERSPECTIVE website. This account allows you to access the available services, manage your purchases, subscriptions, and AI generation credits.
2. Choose Your Software License
Two options are available:
- Monthly Subscription: Access A-I-DESIGN through a recurring subscription, according to the terms of the selected plan.
Or
- Lifetime License: Purchase a permanent license to use A-I-DESIGN without recurring subscription payments, subject to the license terms.
3. Choose How to Access OpenAI Services
To use the AI-powered image generation features, you can choose between two options:
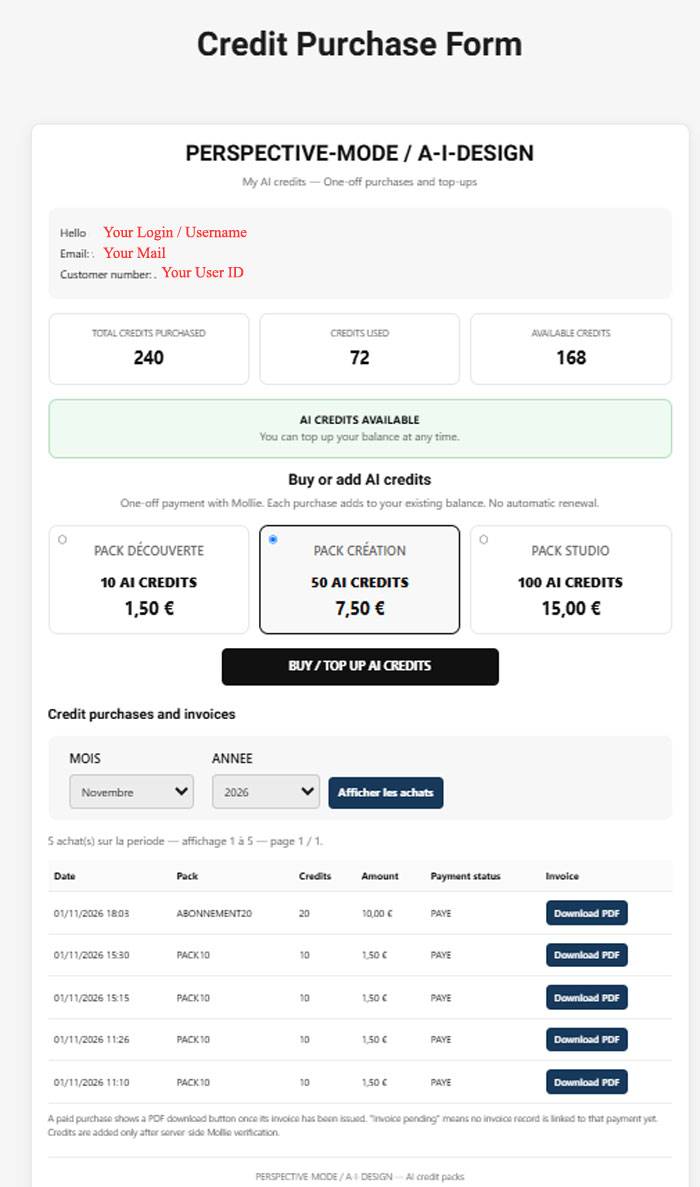
- Purchase OpenAI Credits through PERSPECTIVE: Buy AI credit packs directly from the PERSPECTIVE website and use them within A-I-DESIGN.
Or
- Use Your Own OpenAI Account: Enter your personal OpenAI API key into A-I-DESIGN and generate images using your own OpenAI account, with usage billed directly by OpenAI.
Once these three steps are completed, you can start using A-I-DESIGN and its AI-powered features according to your selected software license and OpenAI access method.
Use Cases
The AI Studio module can be used to:
- transform a personal sketch into a realistic visual or 3D presentation;
- dress a mannequin in a sketched garment;
- apply a fabric, pattern, or texture to a garment;
- create different views of the same product;
- create accessories, backgrounds, or graphic compositions;
- generate multiple concepts from a single idea;
- precisely modify each variation;
- create a cohesive collection based on a project;
- rapidly prepare visuals that would take days to produce using a traditional image editor.
Use Cases
The AI Suggestions Workshop module allows you to:
- quickly search for creative ideas;
- generate proposals for multiple elements of a collection;
- obtain suggestions for garments, accessories, materials, or decorative elements;
- compare different artistic directions;
- create an image library organized by category;
- prepare the visual foundation for a future project;
- transfer a suggestion to the AI Studio for further development or modification;
- accelerate the research, inspiration, and design phases.
Complementarity of the two modules
AI Suggestions Workshop
↓
Idea exploration and rapid generation of proposals
↓
Selection of a promising suggestion
↓
Transfer to AI Studio
↓
Customization, modification, and creation of variations
↓
Project organization and collection creation
↓
Saving the final result
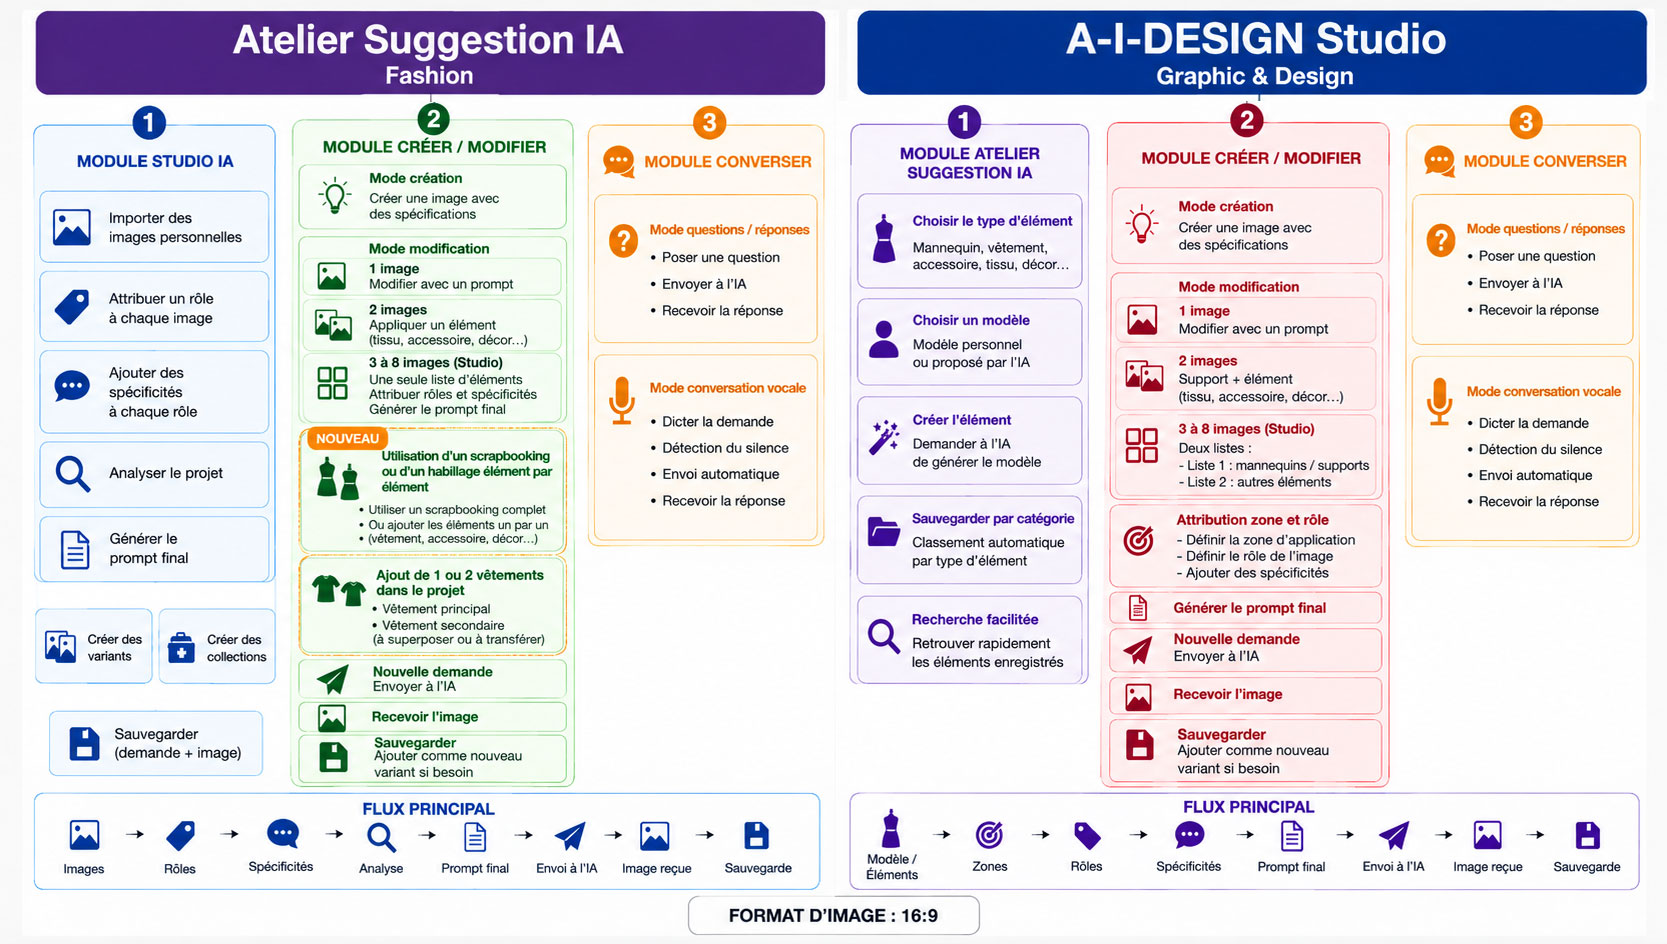
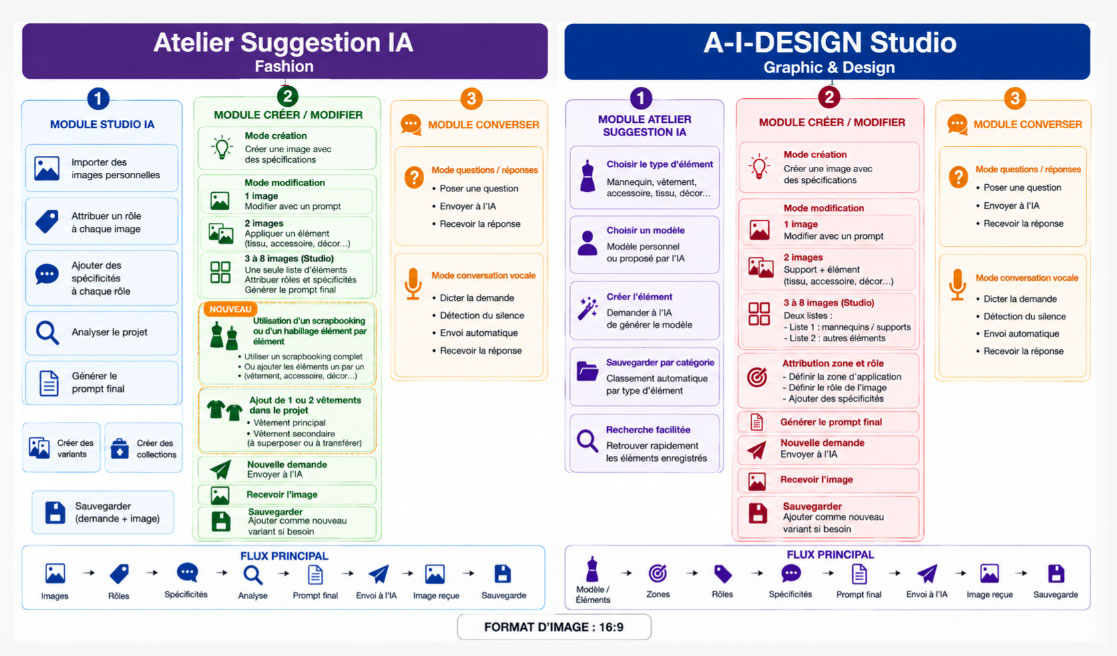
AI SUGGESTION WORKSHOP
│
├── 1. AI SUGGESTION WORKSHOP
│ │
│ ├── Selection of elements to create
│ │ │
│ │ ├── Male model
│ │ ├── Female model
│ │ ├── Dress
│ │ ├── Jacket or blazer
│ │ ├── Skirt
│ │ ├── Trousers
│ │ ├── Top or corset
│ │ ├── Coat
│ │ ├── Bag
│ │ ├── Shoes
│ │ ├── Hat
│ │ ├── Jewelry
│ │ ├── Glasses
│ │ ├── Gloves
│ │ ├── Canvas or fabric
│ │ └── Background / Setting
│ │
│ ├── Selection of the base model
│ │ │
│ │ ├── Use a personal model
│ │ └── Ask the AI to generate a new model
│ │
│ ├── Model usage
│ │ │
│ │ ├── A personal model can be used as the base
│ │ ├── An AI-generated model can be used as the base
│ │ ├── The model may already be dressed or undressed
│ │ └── Garments and accessories are automatically
│ │ adapted and resized to the selected model
│ │
│ └── Automatic classification
│ │
│ ├── Each creation is identified by type
│ ├── The image is saved in the corresponding category
│ ├── Elements are grouped automatically
│ └── Saved elements can be quickly reused
│
├── 2. CREATE / MODIFY
│ │
│ ├── Creation Mode
│ │ │
│ │ ├── Draft a request
│ │ ├── Define the characteristics of the model or element
│ │ ├── Choose style and visual parameters
│ │ ├── Generate the prompt
│ │ └── Send the request to the AI
│ │
│ ├── Modification Mode — 1 Image
│ │ │
│ │ ├── Recall an existing image
│ │ ├── Describe the desired modification
│ │ ├── Preserve selected characteristics if required
│ │ │ ├── Pose
│ │ │ ├── Silhouette
│ │ │ ├── Framing
│ │ │ └── Existing visual identity
│ │ └── Send the request to the AI
│ │
│ ├── Modification Mode — 2 Images
│ │ │
│ │ ├── First image: model, garment or base
│ │ ├── Second image:
│ │ │ ├── Fabric
│ │ │ ├── Canvas
│ │ │ ├── Garment
│ │ │ ├── Accessory
│ │ │ └── Background
│ │ │
│ │ ├── Define the role of each image
│ │ ├── Define the area of application if necessary
│ │ └── Example:
│ │ ├── Apply a fabric to a garment
│ │ ├── Dress a model with a garment
│ │ ├── Add an accessory
│ │ └── Replace or add a background
│ │
│ ├── Studio Mode — 3 to 8 Images
│ │ │
│ │ ├── Open the project
│ │ ├── Display all images used
│ │ │
│ │ ├── List 1: models / main supports
│ │ │
│ │ └── List 2: complementary elements
│ │ │
│ │ ├── Main garment
│ │ ├── Secondary garment
│ │ ├── Accessories
│ │ ├── Canvas
│ │ ├── Fabrics
│ │ ├── Backgrounds
│ │ └── Other visual elements
│ │
│ ├── Dressing Methods
│ │ │
│ │ ├── METHOD 1 — Element-by-Element Dressing
│ │ │ │
│ │ │ ├── Select the model
│ │ │ ├── Add the main garment
│ │ │ ├── Optionally add a secondary garment
│ │ │ ├── Add one or more accessories
│ │ │ ├── Add fabrics, textures or canvas if required
│ │ │ ├── Add a personalized setting or background
│ │ │ └── AI automatically integrates, positions
│ │ │ and resizes all selected elements
│ │ │
│ │ └── METHOD 2 — Scrapbooking-Based Dressing
│ │ │
│ │ ├── Select the model
│ │ ├── Select a scrapbooking image containing
│ │ │ the outfit and its associated elements
│ │ ├── The scrapbooking may contain:
│ │ │ ├── Main garment
│ │ │ ├── Secondary garment
│ │ │ ├── Shoes
│ │ │ ├── Bag
│ │ │ ├── Jewelry
│ │ │ ├── Hat
│ │ │ └── Other accessories
│ │ │
│ │ ├── AI identifies the useful visual elements
│ │ ├── AI adapts them to the model
│ │ ├── AI automatically positions and resizes them
│ │ └── The complete outfit can therefore be created
│ │ from a single visual reference
│ │
│ ├── Using 1 or 2 Garments
│ │ │
│ │ ├── One garment
│ │ │ │
│ │ │ └── Main garment worn by the model
│ │ │
│ │ └── Two garments
│ │ │
│ │ ├── Main garment
│ │ │ └── Primary piece of the outfit
│ │ │
│ │ └── Secondary garment
│ │ └── Additional garment to layer,
│ │ superimpose or transfer onto the outfit
│ │
│ ├── Re-Dressing an Existing Model
│ │ │
│ │ ├── Start from an already dressed or undressed model
│ │ ├── Keep or replace the existing garment
│ │ ├── Add a new main garment
│ │ ├── Add a secondary garment if required
│ │ ├── Add or replace accessories
│ │ └── Use either:
│ │ ├── Individual elements
│ │ └── A complete scrapbooking composition
│ │
│ ├── Assigning an Area and a Role
│ │ │
│ │ ├── Select an image
│ │ ├── Define the target area
│ │ ├── Define its role in the composition
│ │ └── Add specific instructions if required
│ │
│ ├── Possible Roles
│ │ │
│ │ ├── Main model / dominant element
│ │ ├── Main garment
│ │ ├── Secondary garment
│ │ ├── Support
│ │ ├── Texture / fabric
│ │ ├── Accessory
│ │ ├── Background
│ │ ├── Lighting element
│ │ ├── Visual detail
│ │ └── Free element
│ │
│ ├── Example — Dressing a Model
│ │ │
│ │ ├── Image 1: model
│ │ │ ├── Area: global
│ │ │ └── Role: main model
│ │ │
│ │ ├── Image 2: main garment
│ │ │ ├── Area: body / clothing area
│ │ │ └── Role: main garment
│ │ │
│ │ ├── Image 3: secondary garment (optional)
│ │ │ ├── Area: selected clothing area
│ │ │ └── Role: secondary garment
│ │ │
│ │ └── Additional images:
│ │ ├── Shoes
│ │ ├── Bag
│ │ ├── Jewelry
│ │ └── Other accessories
│ │
│ ├── Example — Using a Scrapbooking
│ │ │
│ │ ├── Image 1: model
│ │ │ └── Role: main model
│ │ │
│ │ ├── Image 2: scrapbooking
│ │ │ ├── Contains garment(s) and accessories
│ │ │ └── Role: outfit / visual reference
│ │ │
│ │ └── AI recreates the outfit on the selected model
│ │ while respecting the model's body proportions
│ │ and the visual identity of the supplied elements
│ │
│ ├── Example — Applying a Pattern or Fabric
│ │ │
│ │ ├── Garment image
│ │ │ ├── Area: global or selected clothing area
│ │ │ └── Role: main garment / support
│ │ │
│ │ └── Fabric or pattern image
│ │ ├── Area: top, bottom, collar, sleeve
│ │ │ or selected area
│ │ └── Role: fabric / texture / graphic fill
│ │
│ ├── Preparing the Final Prompt
│ │ │
│ │ ├── Check selected images
│ │ ├── Check the model or main support
│ │ ├── Check main and secondary garments
│ │ ├── Check assigned areas
│ │ ├── Check roles
│ │ ├── Check specific instructions
│ │ ├── Check accessories and background
│ │ └── Automatically generate the final prompt
│ │
│ └── Submission, Saving and Variants
│ │
│ ├── Click "New Request"
│ ├── Send the project to the AI
│ ├── Receive the generated image
│ ├── Review the result
│ ├── Save the image
│ ├── Classify it in the appropriate category
│ │
│ └── If another interpretation is required:
│ ├── Modify the instructions or settings
│ ├── Generate a new image
│ └── Add it as a new variant
│
└── 3. CONVERSATION
│
├── Question / Answer Mode
│ │
│ ├── Write a question or request
│ ├── Send it to the AI
│ └── Receive and display the AI response
│
└── Voice Conversation Mode
│
├── Dictate the request
├── Automatically detect the end of speech
├── Automatically send the request
└── Receive the AI response
FLOWCHART 1
A-I-DESIGN STUDIO (Graphic & Design)
The main distinction between the two environments is as follows:
└── General graphic creation
Combination of images, roles, specifications,
variants, and collections
AI SUGGESTION WORKSHOP
│
└── Fashion-oriented creation
Models, clothing, accessories, fabrics,
application areas, and categorization
The general operation of this first environment can be summarized as follows:
Import images
↓
Assign roles
↓
Add specifications
↓
Analyze the project
↓
Generate the final prompt
↓
Send the request to the AI
↓
Receive the image
↓
Save the result
↓
Create variants or collections
A-I-DESIGN STUDIO
│
├── 1. AI STUDIO
│ │
│ ├── Creating a graphic project
│ │ │
│ │ ├── Import one or more personal images
│ │ ├── Select images required for the project
│ │ ├── Assign a role to each image
│ │ └── Add a specific detail to each role if necessary
│ │
│ ├── Preparing the request
│ │ │
│ │ ├── Check selected images
│ │ ├── Check assigned roles
│ │ ├── Check added specifications
│ │ ├── Launch project analysis
│ │ └── Automatically generate the final prompt
│ │
│ ├── Creating variants
│ │ │
│ │ ├── Select a reference image
│ │ ├── Add a specific request for the variant
│ │ ├── Optionally add an additional personal image
│ │ ├── Generate the new variant
│ │ └── Save the variant to the project
│ │
│ └── Managing collections
│ │
│ ├── Create a collection within the project
│ ├── Group multiple variants
│ ├── Categorize proposals by theme or usage
│ └── Quickly recall a saved collection
│
├── 2. CREATE / EDIT
│ │
│ ├── Creation Mode
│ │ │
│ │ ├── Draft a request
│ │ ├── Define visual specifications
│ │ ├── Choose style, format, and quality
│ │ ├── Generate the prompt
│ │ └── Send the request to the AI
│ │
│ ├── Edit Mode
│ │ │
│ │ ├── Edit a single image
│ │ │ │
│ │ │ ├── Recall an existing image
│ │ │ ├── Describe changes in the prompt
│ │ │ └── Generate the new version
│ │ │
│ │ ├── Edit two images
│ │ │ │
│ │ │ ├── First image: model or base image
│ │ │ ├── Second image: canvas, fabric, accessory, or background
│ │ │ ├── Describe the action to apply to the first image
│ │ │ └── Example: fill a garment with a pattern
│ │ │ or add an accessory to the mannequin
│ │ │
│ │ └── Editing three to eight images — Studio Mode
│ │ │
│ │ ├── Open project details
│ │ ├── Display all project images
│ │ ├── Load images into a single list
│ │ │ │
│ │ │ ├── Bases
│ │ │ ├── Characters
│ │ │ ├── Accessories
│ │ │ ├── Backgrounds
│ │ │ ├── Textures
│ │ │ └── Other graphic elements
│ │ │
│ │ ├── Select each image
│ │ ├── Assign a role to each image
│ │ ├── Optionally enhance the role
│ │ │ │
│ │ │ ├── Reduce the element's size
│ │ │ ├── Modify its color
│ │ │ ├── Modify its position
│ │ │ └── Specify its use in the composition
│ │ │
│ │ └── Generate the final prompt
│ │
│ ├── Final prompt generation
│ │ │
│ │ ├── Automatically lists project images
│ │ ├── Incorporates assigned roles
│ │ ├── Integrates additional specifications
│ │ ├── Structures the request by element
│ │ └── Avoids manual rewriting of all instructions
│ │
│ └── Sending and saving
│ │
│ ├── Review images, roles, and specifications
│ ├── Click "New request"
│ ├── Wait to receive the generated image
│ ├── Click "Save request + image"
│ └── For a new version:
│ │
│ ├── Modify the request
│ ├── Submit a new generation
│ └── Save the image as a new project variant
│
└── 3. CONVERSE
│
├── Question/Answer mode
│ │
│ ├── Type or dictate a question
│ ├── Send the request to the AI
│ └── Wait for and view the answer
│
└── Voice conversation mode